Archive | Recipes RSS feed for this section

Crispy, Plump, and Juicy Fried Oysters

19 Feb

Is there anything better than a pipping hot fried oyster? It’s sweet and briney juices just burst in your mouth after you bite through it’s crispy and buttery envelope, all contrasted by the lemony, tangy taste of homemade tarter sauce–Mmm mmm mmm!

I love fried oysters so much that I asked Santa to bring me some for Christmas–and lucky me, his elf Jenna (my wonderful sister-in-law) delivered! (this tells you how behind I am on my blog posts!)

Anyway, these oysters were so delicious they really were little, pipping hot Christmas miracles. If you love fried oysters too, here’s how to create your own little fried Christmas miracles:

Ingredients for Homemade Roasted Red Pepper Remoulade:

  • 2 eggs
  • 1 tspn Dijon mustard
  • 1 cup of olive oil
  • 2 lemons
  • 1 tspn minced garlic
  • 1/2 tspn anchovy paste
  • 1 tbspn Worcester sauce
  • Tabasco sauce
  • 1 7.5 oz can of roasted red peppers
  • salt and pepper

Check the seafood counter at your local grocery store for freshly shucked oysters by the pint. Jenna found these ones at Costco.

Ingredients for fried oysters:

  • 1 can of Wondra flour (or another brand of very fine flour)
  • Cayenne powder
  • Paprika powder
  • salt and pepper
  • 2 pints of freshly shucked Oysters (Jenna used Willapoint–for some great info on Oyster varieties I recommend checking out the Oysterpedia iPhone app from one of my favorite restaurants, Mermaid Inn)

Directions for Red Pepper Remoulade:

  • Separate the yolks and whites of 2 eggs and, in a large mixing bowl add the 2 yolks to 1 tspn of Dijon mustard.
  • While whisking the yolks and mustard vigorously, slowly drizzle in about  1 cup of olive oil.  After 2-3 minutes of whisking the mixture will emulsify into a mayo.  It will be thick, tight, and pasty.

Tip: to keep your bowl stationary, use a dish towl to create a "nest" for your mixing bowl that will anchor it while you whisk.

  •  Zest 2 lemons and add the zest to the mayo, then cut the lemons in half and add the juice of the lemons to the mayo as well. This will both loosen up the sauce, so it gets to the right dipping consistency, and add a nice tangy flavor.
  • Chop and mince 3-4 garlic cloves until you have about 1 tspn of minced garlic. Stir the minced garlic, and 1/2 tspn of anchovy paste, into the mixture.
  • Add 1 tbspn of Worcester sauce (or to taste) and 6 shots of Tabasco sauce (or to taste) to the mixture.

Shhh--Worcester sauce is Jenna's secret ingredient--it gives the remoulade a deeper savory flavor.

  • Taste the mixture, then add salt and pepper to taste. The consistency at this point will be that of an aioli.
  • Open 1 7.5 oz can of roasted red peppers, chop and mince them. Add them to the sauce.

Tip: IIf the sauce is too thin for your liking after adding the roasted red peppers, you can add some sour cream or mayo to thicken it up.

Ok, that’s the sauce! Now for the oysters…

Directions for making fried oysters:

  • First, pour in 2 quarts of peanut oil into a deep frier (or pot on the stove) and begin to heat. I like using peanut oil for frying because it has a high smoking point (the temperature to which an oil can be heated before it smokes and discolors—indications of decomposition) which means that it won’t absorb or transfer unsavory flavors into your meal.
  • Then, create the breading mixture by pouring enough Wondra flour into a glass baking dish to coat the oysters, about 3-4 cups.
  • Season your flour by adding salt and freshly cracked pepper, as well as a few dashes of cayenne and paprika powder.
  • Take your 2 pints of freshly shucked oysters and drain some of the liquid off (fun fact–oyster “liquid” is caused oyster liquer). Then, place your oysters into the flour mixture, coat, and toss.

toss your oysters in your flour mixture until they are evenly coated

  • Once your oil has reached 350 degrees F, you’re ready to fry! Before you begin, you may want to prepare a plate with paper towel on it to receive the fried oysters.
  • One at a time, shake any extra flour off of your coated oysters (to keep your oil fresh you want to make sure that the oyster is evenly coated, but there is no extra breading). Then, slip them into the hot oil, making sure not to overcrowd the frier (that way the temp of the oil will stay stable and the oysters will cook quickly and evenly).
    Once the oysters are fried, let them rest for a few seconds on a paper towel, to drain off any additional oil. You’ll know they’re done when they crisp up and turn a nice, golden brown. Enjoy!

Quick and Easy Plum Tarte

9 Mar

I’ve mentioned previously why I think of Ina Garten, better known as the Barefoot Contessa, as my kitchen fairy godmother–basically it’s because her recipes are quick, easy, and delicious. What better combination is there?

Anna Pump, who once worked with Garten and now owns the wonderful bakery, Loaves and Fishes, creates wonderful food following Garten’s no-fuss philosophy. Lucky me, Trusty’s mom and dad always stop by Loaves and Fishes when they go out to the Hamptons and bring us one of Pump’s amazing Plum Tartes…which I promptly eat in one sitting.

Unable to track Pump’s recipe down, I’ve devised my own, inspired by hers–it’s quick and easy to prepare (partially because I buy the crust, frozen)–and not to brag, but this tarte tastes as good as the original! Hope you enjoy!

Ingredients

  • 1/2 cup of brown sugar
  • 2 pounds of firm, ripe Plums
  • 1/2 cup of creme de cassis liqueur (this is the secret ingredient!)
  • a squeeze of fresh lemon juice (about half a lemon)

Directions

  1. Preheat the oven to 400 degrees F.
  2. Pit and slice the plums into wedges.
  3. In a large bowl, mix the plum slices together with the sugar, cassis, and the squeeze of fresh lemon juice. Let the fruit sit in the bowl for about 10 minutes; it will begin to macerate.
  4. Pour the plums into a frozen pie crust (or, extra points if you prepare your own!)

    Nothing wrong with taking a little shortcut...

  5. Arrange the slices so they are skin-side down. If you are entertaining, you can arrange the plums in a “flower” pattern by beginning at the outside and working your way in. Or, just go with an organic arrangement–it’ll taste just as good.

    Go with a fancy pants flower pattern...

    ...or take the no-fuss route (just make sure the plum wedges are skin-side down).

  6. Bake for 35-40 minutes, or until the the crust is lightly browned and the plum juices are bubbling.
  7. Remove from the oven and cool for 10 minutes. Serve warm or at room temperature–enjoy!

    Sweet, juicy, and so easy to make!

Elegant Bridal Shower Meal: (Vegetarian) Eggplant Timbale

12 Jan

Need a casserole recipe that’s hearty, yet elegant enough for entertaining? I highly recommend an Eggplant Timbale. Full of fresh, delicious flavors and wrapped up in thinly sliced, sautéed eggplant strips, this casserole looks like a beautiful present.  It will impress your guests with both its looks and taste.  

Traditionally, this Italian dish includes ground beef and Italian pork sausage, but for a recent bridal shower I adapted the original recipe, which I found in a cookbook by Food Network’s Giada de Laurentiis, to be vegetarian. Stacked high with layers of roasted root vegetables, the dish is just as hearty and satisfying as it is with meat, and I think all the different colors of the vegetables–yellow, orange, purple–makes for an even more beautiful presentation.

Traditional Eggplant Timbale (with meat)

* Note: You will need a springform pan for this recipe, in order to make the pie shape of the casserole. While you can certainly make it in a regular casserole dish and it would taste just as delicious, I recommend using the springform pan if you are using this recipe for entertaining, as the pie shape is what gives this recipe its elegance.  

For this recipe, using a springform pan is key to a beautiful presentation.

Ingredients:

  • 4 medium eggplants, sliced lengthwise into thin strips, about 1/4 inch thick
  • 2 sweet potatoes, sliced lengthwise into thin strips, about 1/2 inch thick
  • 4 parsnips, peeled and sliced into thin medallions, about 1/2 inch thick
  • 4 carrots, peeled and sliced into thin medallions, about 1/2 inch thick
  • 2-3 golden beets, peeled and sliced into medallions, about 1/2 inch thick
  • 2-3 red beets, peeled and sliced into medallions, about 1/2 inch thick
  • 1 butternut squash, peeled and sliced lengthwise into thin strips about 1/2 inch thick
  • 1 jar of tomato sauce
  • 1 cup freshly grated Pecorino cheese
  • 1 cup of chopped fresh basil leaves
  • 1/2 pound of penne pasta
  • olive oil
  • kosher salt
  • pepper

Directions:

  1. Preheat your oven to 425 degrees F.
  2. Start by washing and peeling your eggplants. Then, slice the eggplants lengthwise into thin 1/4 inch slices. Lay the slices out on a clean towel and sprinkle kosher salt over them, then let them sit for 20-30 minutes while you prepare the other vegetables. Eggplants have brown seeds in them that contain a bitter liquid. By salting or “degorging” the eggplant slices before you cook them, you can draw out the bitter moisture, leading to a better taste and firmer texture.   

    You should be able to see liquid coming to the surface of your eggplant slices within 20-30 minutes after salting them.

  3. While your eggplant slices are degorging, you can prepare the other vegetables. Wash and peel the sweet potatoes, butternut squash, parsnips, carrots, and beets. Then, slice the sweet potatoes and squash into 1/2 inch strips lengthwise, and slice the parsnips, carrots, and beets into 1/2 inch medallions.

    All the bright, vibrant colors of the fresh root vegetables make for a beautiful presentation when you serve a slice of this timbale.

  4. Roast the veggies: Put all your sliced veggies onto baking trays, drizzle with olive oil, sprinkle with salt and pepper, and put them into the oven to roast. This should take about 15 minutes, depending on your oven.  Since the eggplants, which will form the “wrapping paper” on this casserole, are already salted because of the degorging process, you can go very light on the salt for the veggies.
  5. Saute the eggplant: If it’s been about 15-20 minutes, your eggplants should be ready to cook. With a paper towel, pat them dry, and try to absorb all the moisture you can. Place a medium-large nonstick pan over medium high heat and drizzle the pan with olive oil. When the pan and oil are hot, place 2-3 strips into your pan (depending on how many will fit comfortably) and saute the eggplant slices on both sides. As they cook they’ll become tender and slightly translucent.
  6. Cook the pasta: While your veggies cook, put a large pot of salted water on the stove and bring it to a boil. Add the pasta and cook until tender but still firm to the bite, stirring occasionally, 8 to 10 min. You want the pasta to be slightly more on the toothy side than al dente because when you put the casserole in the oven to reheat it, the pasta will cook further.
  7. Assemble the Timbale: When your eggplants are sautéed, your root vegetables are roasted, and your pasta is cooked and strained, the timbale is ready to assemble. Start by brushing your springform pan with a little bit of olive oil, to ensure that the sides don’t stick to your eggplant when it comes out of the oven. Then, lay down strips of eggplant so they line the pan. Because the eggplant will form the “wrapping” on your casserole, you want to make sure that the slices overlap and hang over the edge of the pan, so you’ll have enough eggplant to fold over and cover the top of the casserole after you’ve added all the veggie layers. You may want to reserve a few sautéed slices to cover any holes in the top.
  8. Add layers of veggies: When your eggplant liner is in place, add your roasted vegetables, one layer at a time. In between each layer, spread a very thin coat of tomato sauce, then sprinkle on a light dusting of the freshly grated Pecorino cheese, then add a few pinches of some freshly chopped basil. Before I add the sauce, cheese and basil, I always press each layer down firmly with the palms of my hands, to make sure there will be a nice tight fit. When you get to the middle of the casserole, add a layer of penne pasta which should have extra sauce and cheese.  TIP: I like to alternate the veggies sliced lengthwise (sweet potato and squash) with the medallion shaped slices (beets, parsnips, carrots) to create an alternating color scheme and add structural support to the casserole–by alternating the lengthy pieces with the medallion ones, the casserole will keep its pie shape nicely and won’t collapse when you cut into it. Also, you don’t want to add too much sauce in between the veggie layers or else your casserole will be too mushy.

    A slice looks so pretty on the plate--and tastes delicious!

  9. Reheat: When your layers are complete, fold over the eggplant slices, add another dusting of cheese. You can wrap it in aluminum foil and refrigerate for a few days until your party. To reheat it, put it into a 350 degree oven for about 30 minutes, until the timbale is warmed through and the cheese has melted. You’ll begin to smell the delicious aroma of the roasted, carmalized veggies–yum!  
  10. To serve: let the reheated Timbale rest for 10 minutes. Then, unclasp the springform pan, and use a sharp knife to slice. Hopefully your guests will rave about the different flavors and the different colors that create such a beautiful presentation.

There are lots of different ways you could modify this recipe–if you have a gluten-free crowd, don’t include the pasta layer. If you have a dairy-free crowd, skip the cheese or use a soy substitute. If you want the meaty texture of the original recipe but a vegetarian version, you can use Morningstar farm crumbles instead of the meat and pork sausage.

Hope you enjoy!

Eating the Seasons: Roasted Jerusalem Artichokes (a.k.a. Sunchokes)

13 Dec

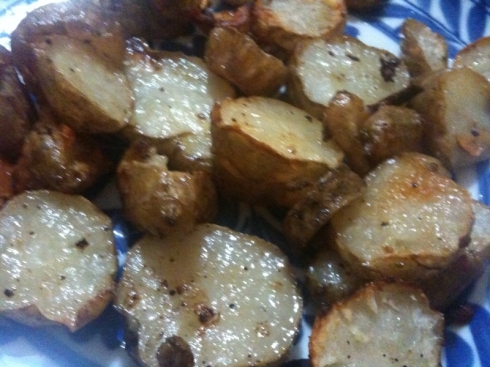
There’s nothing like having a new food experience. When you find a new ingredient you really love, you want to eat it all day, everyday, for an entire week; you can’t get enough. You ask, “sunchokes, where have you been all my life?!?” Or at least, that’s what I did.

So yummy!


I was introduced to sunchokes for the first time over Thanksgiving break, when I got a chance to eat at Heartland, the new James Beard nominated restaurant in Minneapolis-St. Paul. Heartland’s philosophy is that local, sustainable ingredients make the most delicious meals, and I believed them more with every bite. Roasted sunchokes were the highlight of my dish, walleye with kale and chanterelle mushrooms in a tomato broth. They had the rich, nutty sweetness of an artichoke heart crossed with the creamy texture of roasted fingerling potatoes.  YUM!

Because they have such a similar flavor to artichokes, I was surprised to find out that sunchokes, which are also known as Jerusalem artichokes, aren’t actually related to their namesake vegetable. Sunchokes are actually a type of sunflower, and their root, which is a tuber that actually looks a lot like ginger root, is what you eat. I love the flavor you get from roasting them like a root vegetable–and I also love that, as you can see from the recipe below, it makes for a quick and easy meal–but you can also shave them very thinly and eat them raw on a salad. Best of all, sunchokes are packed with potassium (650 mg per cup) and iron, which makes them a yummy, nutritious alternative to potatoes.

Directions:

  1. Scrub the tubers and remove any black “eyes”, just like you would clean a potato. You don’t need to peel the skin off of the chokes–it contains a lot of nutrients, and has a delicious flavor and texture after you roast them.

    Don't sunchokes look just like ginger root?

  2. Slice them up into medallion-sized pieces.
  3. Place the pieces onto a roasting sheet covered with aluminum foil, drizzle with olive oil, and sprinkle with sea salt, pepper, and a little garlic powder.
  4. Roast in the oven at 400°F for 15-20 minutes, or until the pieces become deliciously golden brown.
  5. Enjoy!

Sweet and Spicy Chai Hot Chocolate

21 Nov

Can’t decide between a rich hot chocolate and a comforting chai tea? Try a Chai Hot Chocolate! My Trusty Sidekick came up with the idea inspired by one of my favorite chocolate bars, Dagoba’s Chai Chocolate.  It’s warm and sweet with the slightly spicy kick of ginger–like a mellow version of a Mexican hot chocolate.  This is my new favorite drink for a cold night–hope you enjoy!

Ingredients:

  • 4 cups low-fat (1%) milk (or any milk of your choice)
  • 1 bar of Dagoba Chai Chocolate bar
  • Directions:

    • Coarsely chop up the chocolate bar and add it to the milk. Heat over a low heat and stir until the chocolate melts into the milk.
    Note: If you don’t have access to Dagoba chocolate bars, make your own Chai Chocolate mix. Add 3/4 cup of chocolate chips to 4 cups of milk, and stir on low heat until the chocolate melts. Then, add 2-3 chai tea bags to the hot milk, and allow it to seep for 3-5 minutes. 

    A Light Rice Pudding You’ll Love

    19 Oct

    Looking for a lighter dessert that will still satisfy your sweet tooth? Here’s a recipe for a light rice pudding you’ll love. Even though there are no eggs or butter included, the evaporated skim milk keeps the rice nice and creamy. A little bit of brown sugar keeps the dessert sweet while plump yellow raisins and dried cherries add fantastic texture. Serve with just a dash of cinnamon or nutmeg and a drizzle of honey and you have a comforting, healthy dessert that’s perfect for a crisp fall day.

    Serves 4

    Ingredients:

    • 1 cup rice (for best results, use short grain or medium grain rice–long grain rice will not work)
    • 1/4 teaspoon of salt
    • 1 (12 ounce) can evaporated skim milk
    • 1/3 cup brown sugar
    • 1/2 teaspoon orange zest
    • 1/2 cup milk (I like to use soy milk to add a bit of nuttiness, but you can choose your type of milk depending on how “Light” you want your rice pudding to be.)
    • 1/2 teaspoon vanilla extract
    • 1/8 teaspoon almond extract
    • 1/2 cup dried cherries
    • 1/2 cup of yellow raisins
    • a drizzle of honey, to taste
    • 1/4 teaspoon of cinnamon (or nutmeg, if you prefer), to taste

    Give the rice a chance to soak up all the liquid. It will ensure a creamy, satisfying dessert, even without eggs or butter.

    Directions:

    1. Add 1/4 teaspoon of salt to 2 cups of water and bring it to a boil. Add rice and cook until tender, stirring frequently. When the rice is cooked all the water should be absorbed.
    2. Add the evaporated milk, orange zest, and brown sugar to the pot of cooked rice; cover and cook for 10 minutes.
    3. Uncover and cook, stirring frequently, for another 10 minutes or until the rice is very creamy and most of the liquid has been absorbed.
    4. Stir in the milk, vanilla and almond extracts and remove the rice from heat.
    5. While the rice is cooling to room temperature, boil an extra 1/4 cup of water and pour it into a mug. Add the yellow raisins to the water and stir, then let them sit for 5-10 minutes. This will plump up the raisins and bring out their sweetness.
    6. When the rice is at room temperature, stir in the dried cherries and the plumped up raisins and refrigerate for 2 hours or until chilled.
    7. When you serve up your rice pudding, add a dash of cinnamon or nutmeg to each serving and drizzle with honey for a great presentation.
    8. Enjoy!

    Mmm. Look how plump those yellow raisins are.

    Note: Yellow raisins are my favorite, but one of the best things about this dessert is that you can get creative and customize the “add-ins.” Try shredded coconut and pineapple, or go for fresh strawberries and blueberries. You could also toast some almond slices and sprinkle them on top. Once I tried adding a spoonful of fresh pomegranate seeds–the pop of juice against the creamy rice made a great flavor/texture combination.

    Easy and Healthy Friday Night Dinner: Salmon with Roasted Carrots, Sweet Potato, and Colored Cauliflower

    10 Sep

    Fall semester began this week, and with the first week of classes were some quick take-out meals and half dinners (nothing like a couple handfuls of Kashi cereal). As a result, tonight Trusty and I were craving a healthy, satisfying dinner, and nothing seemed to fit the bill better than a thick piece of fish and some hearty roasted vegetables. So we splurged on two pieces of wild Alaskan King Salmon and picked up some carrots, a sweet potato, and a package of colored cauliflower. Colored cauliflower, you say–what’s that?! We said the same thing. A little research revealed this information:

    • Orange cauliflower contains 25 times the level of Vitamin A in the traditional white variety. The color comes from a natural mutation originally found in cauliflowers grown in a Canadian field in the 1970s.
    • Green cauliflower has been available in the US since the early ’90s. It’s actually cross between broccoli and cauliflower (and to me tastes more like broccoli than cauliflower).
    • Purple cauliflower is caused by the presence of the antioxidant anthocyanin, which also is found in red cabbage and red wine. It has a milder taste than traditional cauliflower, but is still very creamy, sweet, and slightly nutty.

      Delicious and pretty!

    The preparation for this meal is wonderfully minimal. And lucky me, Trusty did all the cooking. Basically, you cut, season, then throw everything into the oven. This makes clean-up easy too–everything is roasted on baking sheets covered in aluminum foil, so you just throw the foil away–no scrubbing involved.

    Here are our cast of characters: 1 sweet potato, a package of colored cauliflower, 2 carrots, and just under 1 pound of Wild Alaskan King Salmon (not pictured: 1 lemon (he's camera shy)).

    Because the veggies will need to cook longer, get them prepped and in the oven first, then prep the salmon. When the veggies have 15 minutes left to cook, slide the salmon into the oven and there will be just enough time for it to cook, then rest, before the veggies finish up and it’s time to eat!

    yum yum yum

    To prepare the vegetables:

    • First, wash your veggies! Pre-heat the oven to 400°F.
    • Slice the carrots and sweet potato into wedges–either quartered or halved depending on the thickness. If you didn’t buy pre-sliced cauliflower, cut it up into florets.
    • Line 2 baking sheets with aluminum foil. This makes for really easy clean-up.
    • Place the carrot and sweet potato wedges on one baking sheet, and the cauliflower on another (this is because the cauliflower take a little longer to cook, so they need their own tray). Drizzle a little olive oil (about 2 tablespoons) and sprinkle salt and pepper over both trays of veggies.  Then, sprinkle some garlic powder over the cauliflower, and some chili powder over the carrots and sweet potatoes (this is only personal preference!).
    • Put both trays in the oven. Sweet potatoes and carrots will need about 30-35 minutes, and the cauliflower will need  about 40 minutes.

    To prepare the salmon:

    • Line a baking sheet with aluminum foil, and add a dab of olive oil to the spot where you’ll place the fish fillets (this will make it easier to remove them).
    • Sprinkle salt, pepper, chili powder, and garlic powder on the salmon fillets. Slice up a lemon and add some slices on top.

      Cooking salmon in the oven is my favorite way to prepare it, or almost any kind of fish. It's hands-off and fool-proof, as long as you take the salmon out of the oven when the fat begins to appear. In my opinion it's the best way to keep a piece of fish moist, flakey, and flavorful.

    • Put into the oven (preheated to 400°F) for around 10 minutes (these were thicker pieces of salmon–about 1.5 inches–if you have a thinner fillet, you won’t need as much time).  When the fat/protein begins rising to the surface/sides of the fillet (it’s a whitish liquid), remove the fish from the oven and let it rest for 3-5 minutes.

    Enjoy!

    Look how pink and moist that fish is--YUM! King Salmon is especially delicious because it has a higher oil content, which gives it a rich (but not fishy) flavor and firm meat.

    Ravioli Extravaganza Part 2: Pea, Mint, and Parmesan Ravioli

    10 Sep

    Here’s Part 2 of Ravioli Extravaganza–Pea, Mint, and Parmesan raviolis!!

    The ingredient combination for this filling was inspired by the amazing recipe for Ricotta Ravioli with Pistachios, Peas, Mint, and Parmesan, that I made this summer with my Aunt Mary Kay. Instead of being part of the pasta topping this time sweet peas, fresh mint, and salty Parmesan team up to make the filling inside the pasta.

    If you’re looking for Part 1 of the Extravaganza (Mushroom and leek ravioli), click here. I hope to get Part 3 (crab and cauliflower) up soon!

    Pea, Mint, and Parmesan Ravioli

    Note: For this recipe, you’ll need a hand blender, a blender, or a Cuisinart to puree the ravioli filling. This recipe makes approximately 25-30 raviolis.

    The mint-pea combination in this recipe is killer. The raviolis are so fresh and delicious.

    Ingredients:

    • 1 cup of frozen peas
    • 1/2 cup of freshly grated Parmesan cheese, plus additional “ribbons” to garnish
    • 10-15 fresh mint leaves
    • 1 teaspoon of salt (plus additional to salt your pasta water)
    • 1/2 teaspoon of pepper
    • 1 package of  Egg roll wrappers (we used Nasoya brand, in case you’re curious)
    • olive oil
    • 1 egg (for egg wash)

    Directions:

    1. First, you have to cook the peas, but you don’t want to overcook them. So, start by preparing an ice bath in your sink to shock the peas with, to make sure they stop cooking.
    2. Bring a small pot of salted water to a boil. Add peas and flash cook them–30 seconds to 1 minute–until they are just tender. Pour them into a colander so the hot water drains out, then plunge the colander with the peas in it into the ice bath.

      Using an ice bath to stop the peas from cooking will ensure that they're sweet, flavorful, and bright green! We eat with our eyes, too, right?

    3. Roughly chop up the mint leaves, put them into a bowl, and add the peas, Parmesan, salt and pepper. Use a hand blender until the ingredients are combined. They should still be slightly chunky–you don’t want them pureed.

    4. Crack open the egg and add a spot of water, milk, or cream (whatever you have in the fridge will work). Whisk it up with a fork. Voila, your egg wash, which will be the glue to hold your pasta sheets (eggroll wrappers) together.
    5. Place an eggroll wrapper on a clean, flat surface.  Use a brush to cover the pasta with a coating of egg wash. Put a small amount of pea filling in each of the four corners of the pasta sheet (be sure not to overstuff them–you’ll just end up with pea filling escaping into the water when you go to boil your ravioli). Then, take a second sheet and place it on top, pressing the edges down to seal. Use a knife to cut the sheet into your four raviolis. Repeat with remaining wrappers and filling. As your finished ravioli begin to stack up, douse a little olive oil on top of them so they don’t stick together.
    6. Bring a pot of salted water to a gentle boil, and add a little bit of olive oil to the water (again, to prevent the ravioli from sticking together). Boil ravioli in small batches–should take about 2 minutes per batch–and remove with a slotted ladle or spoon.
    7. To serve, drizzle with olive oil and sprinkle with parmesan ribbons. Adding some freshly ground black pepper on top is also delish!

      YUM!

    Ravioli Extravaganza, Part 1: Mushroom and Leek Ravioli

    2 Sep

    Before I head to Boston for my first class, Trusty and I are having our friends Grace and Andrea over for a little “dinner party” (air quotes are used here because we don’t even own a full set of 4 napkins). Earlier this year we had an amazing meal at their apartment–home-made curry, and shrimp spring rolls with a home-made peanut dipping sauce–and so the food bar was set very high. To sufficiently wow them, we decided to prepare a “Ravioli Flight” (again, these air quotes are coming in handy!)–a.k.a. we made three types of ravioli fillings, bought three packages of egg roll wrappers, and stuffed our little hearts out, filling wrapper sheet after wrapper sheet.  The result was a filling meal (couldn’t resist!) we were very proud of.

    So, stay tuned for Part 2 (Spring Pea, Parmesan, and Mint) and Part 3 (Shallots, Cauliflower, and Lump Crab). In the meantime, this first filling, mushroom and leek, is fantastic. The deep, earthy, and meaty flavor of the mushrooms plays really well off of the delicate sweetness of the leeks. Add some dry white wine and rich heavy cream and you pretty much have heaven in a ravioli.

    Mushroom and Leek Ravioli

    Note: for this recipe, you’ll need a hand blender, a blender, or a Cuisinart to puree the ravioli filling.

    Ingredients:

    • 1 package of  Egg roll wrappers (we used Nasoya brand, in case you’re curious)
    • 1 leek
    • 2 cups of quartered mushrooms (we used half Cremini, half Shiitake)
    • 2 cloves of garlic
    • 1/2 stick of butter
    • 1 1/4 cup of heavy cream
    • 1/4 cup of white wine (we used Sancerre, any dry white wine would be a good substitute)
    • 1 egg (for egg wash)
    • Parsley (optional-for garnish)

    Directions:

    1. With a damp paper towel, gently wipe any dirt off the mushroom caps. This is the best way to clean mushrooms–because they’re so absorbent, you never want to wash or soak them–they’ll become water-logged and lose all their flavor. Once the mushrooms are clean, quarter them.

      No need to quarter the mushrooms neatly, since they'll be pureed by the hand blender later.

    2. Halve the leek down the middle and slice. Peel the garlic and chop finely.
    3. Melt the butter in a hot pan and saute the leek, mushrooms, and garlic until the vegetables start to brown.

      You really want to wait till the mushrooms and leeks are browned. This will bring out the carmalized flavor of the leeks and the deep earthy flavor of the mushrooms.

    4. When the pan becomes dry and you see brown bits beginning to stick to the bottom of the pan, it’s time to deglaze the pan with the white wine. Add the wine to the pan and use a spatula to lift all the grease and bits from the bottom of the pan–that’s a lot of flavor you want to incorporate into the liquid!
    5. Continue cooking the mushrooms and leeks until the wine completely cooks off and the pan is dry again. Then, add the heavy cream.

      Everything tastes better with heavy cream.

    6. Stir in the cream and allow the mixture to continue to cook on gentle heat until the cream is reduced by a third. We found this took about 10 minutes. Then put the mixture into a container and throw it in the fridge for at least 20 minutes until it has cooled completely (if you put the hot mixture directly into the egg roll wraps, they will start to cook and gluck up).
    7. Add a pinch of salt and pepper to the mixture and use the hand blender to puree it (they say it’s best to salt mushrooms after cooking them, because otherwise the salt will draw out the moisture in the mushrooms before they’re cooked).
    8. Now, it’s time to stuff the ravioli with the mushroom filling! Crack open the egg and add a dash of water or heavy cream. Whisk it up with a fork, and you have your egg wash. This will act as the cement or glue that will hold the two sheets of pasta together. Using a brush, brush the egg wash onto one sheet so the surface is covered with your glue. Then, take a spoon and add a small amount of the mushroom filling to each of the four corners.

      Be careful not to add too much filling--if the edges can't seal completely the filling will just seep out when you try to boil the ravioli.

    9. Now, add the second sheet of pasta by laying it over the bottom piece. You don’t need to apply egg wash to the top sheet. Use your fingers to press down around the filling piles so that as little air as possible is left in the parcel.
    10. Use a knife to cut the sheet in half vertically and horizontally, so you’re left with four ravioli. With your fingers, make sure the edges of the ravioli are pinched together completely. You can stack the ravioli waiting to be prepared on a cookie sheet. Just drizzle a little olive oil over them to make sure they don’t stick together.

      This is going to be an amazing meal!

    11. To cook the ravioli, bring a pot of salted water to a gentle boil and add your ravioli. They won’t need to cook long–only a minute or so. When they’re ready they’ll float up to the surface and appear slightly translucent and puffed up (if there’s any air inside).
    12. Add parsley to garnish. Enjoy with a little olive oil and lemon, or some simple tomato sauce.

    Chocolate Bread Pudding with Bacon Crème Anglaise from NYC’s Famous Dessert Truck!

    26 Aug

    Spotting it there, parked at the curb, was a little like spotting a celebrity. Since finding out about the Dessert Truck, New York City’s cult foodie favorite, on the Food Network’s Throwdown with Bobby Flay I’ve been wishing and hoping for the chance to see if their chocolate bread pudding tastes as magical in real life as it looks on tv.

    If you haven’t heard of the Dessert Truck, it’s exactly what it sounds like. Amazing idea, right? In my opinion, the truck’s founders, Jerome Chang (formerly the pastry sous chef at Le Cirque), and Columbia business school student Chris Chen, are scholars and gentlemen for making gourmet desserts mobile. Remember the warm fuzzy feeling you felt as a kid on Christmas Eve, knowing that Santa was out there somewhere in his sleigh, beginning to make his deliveries? That’s sort of how I think of the Dessert Truck, somewhere out there in New York City, bringing delicious $6 desserts to those lucky girls and boys who happen to be walking by.

    If you don't have room in your tummy when you happen upon the Dessert Truck, you can get it to-go, like I did!

    Tonight, that lucky girl was ME! I ordered DT’s famous chocolate bread pudding topped with bacon crème anglaise (if you don’t like bacon, you can get it with vanilla crème anglaise).

    Mmmmmmm

    I thought that the bacon crème anglaise was pretty subtly flavored–it didn’t taste like pork, per say, just extra salty. It made me wish the chocolate flavor of the bread pudding was a little more intense–sweeter, maybe even a bit on the bitter side–in order to adequately play off the salty crème anglaise.

    For presentation purposes, I flipped my pudding upside on a plate.

    The pudding was extremely smooth and custardy. I know from watching the Dessert Truck’s Throwdown episode that they soak their bread pudding overnight to make the bread extra rich and creamy–when you take a bite, you can definitely taste and feel this–the pudding truly has a soft, pudding-y mouth feel.

    I actually wish that the texture was a little more bready–I couldn’t tell the difference between the egg custard and the pieces of bread, and I actually like being able to distinguish between the two. Speaking of the pudding’s egg custard, there was a lot of it–too much. Check out this side view of the bread pudding–you can see that the Dessert Truck doesn’t use much bread–most of it (the entire top layer) was actually only egg custard, without any pieces of bread.  Bread pudding is supposed to be just that–bread pudding–so I have to say that I enjoyed the inside center best, where there was the best bread + custard ratio.

    I hope that the Dessert Truck isn't skimping on bread to save some dough.

    So, what’s my final review? I have to say I was a little disappointed with my Dessert Truck experience. But, you can’t ever give up on Santa, and I won’t give up my faith in the Dessert Truck. That said, if you feel the way I do about bread pudding I’d definitely recommend trying something else–maybe their molten chocolate cake with sea salted pistachios. Doesn’t that sound delicious?

    Until next time, Dessert Truck. Until next time.

    Just because I was a tad disappointed doesn't mean my bread pudding didn't disappear...