Archive | Health RSS feed for this section

Eating the Seasons: Roasted Jerusalem Artichokes (a.k.a. Sunchokes)

13 Dec

There’s nothing like having a new food experience. When you find a new ingredient you really love, you want to eat it all day, everyday, for an entire week; you can’t get enough. You ask, “sunchokes, where have you been all my life?!?” Or at least, that’s what I did.

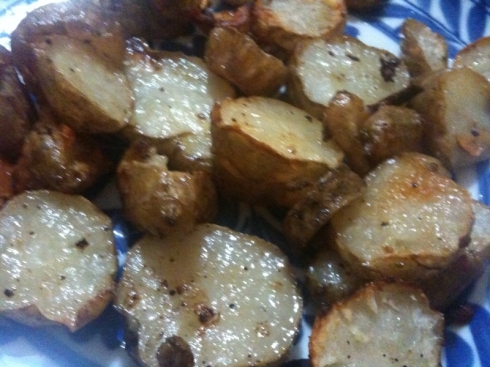
So yummy!


I was introduced to sunchokes for the first time over Thanksgiving break, when I got a chance to eat at Heartland, the new James Beard nominated restaurant in Minneapolis-St. Paul. Heartland’s philosophy is that local, sustainable ingredients make the most delicious meals, and I believed them more with every bite. Roasted sunchokes were the highlight of my dish, walleye with kale and chanterelle mushrooms in a tomato broth. They had the rich, nutty sweetness of an artichoke heart crossed with the creamy texture of roasted fingerling potatoes.  YUM!

Because they have such a similar flavor to artichokes, I was surprised to find out that sunchokes, which are also known as Jerusalem artichokes, aren’t actually related to their namesake vegetable. Sunchokes are actually a type of sunflower, and their root, which is a tuber that actually looks a lot like ginger root, is what you eat. I love the flavor you get from roasting them like a root vegetable–and I also love that, as you can see from the recipe below, it makes for a quick and easy meal–but you can also shave them very thinly and eat them raw on a salad. Best of all, sunchokes are packed with potassium (650 mg per cup) and iron, which makes them a yummy, nutritious alternative to potatoes.

Directions:

  1. Scrub the tubers and remove any black “eyes”, just like you would clean a potato. You don’t need to peel the skin off of the chokes–it contains a lot of nutrients, and has a delicious flavor and texture after you roast them.

    Don't sunchokes look just like ginger root?

  2. Slice them up into medallion-sized pieces.
  3. Place the pieces onto a roasting sheet covered with aluminum foil, drizzle with olive oil, and sprinkle with sea salt, pepper, and a little garlic powder.
  4. Roast in the oven at 400°F for 15-20 minutes, or until the pieces become deliciously golden brown.
  5. Enjoy!

A Light Rice Pudding You’ll Love

19 Oct

Looking for a lighter dessert that will still satisfy your sweet tooth? Here’s a recipe for a light rice pudding you’ll love. Even though there are no eggs or butter included, the evaporated skim milk keeps the rice nice and creamy. A little bit of brown sugar keeps the dessert sweet while plump yellow raisins and dried cherries add fantastic texture. Serve with just a dash of cinnamon or nutmeg and a drizzle of honey and you have a comforting, healthy dessert that’s perfect for a crisp fall day.

Serves 4

Ingredients:

  • 1 cup rice (for best results, use short grain or medium grain rice–long grain rice will not work)
  • 1/4 teaspoon of salt
  • 1 (12 ounce) can evaporated skim milk
  • 1/3 cup brown sugar
  • 1/2 teaspoon orange zest
  • 1/2 cup milk (I like to use soy milk to add a bit of nuttiness, but you can choose your type of milk depending on how “Light” you want your rice pudding to be.)
  • 1/2 teaspoon vanilla extract
  • 1/8 teaspoon almond extract
  • 1/2 cup dried cherries
  • 1/2 cup of yellow raisins
  • a drizzle of honey, to taste
  • 1/4 teaspoon of cinnamon (or nutmeg, if you prefer), to taste

Give the rice a chance to soak up all the liquid. It will ensure a creamy, satisfying dessert, even without eggs or butter.

Directions:

  1. Add 1/4 teaspoon of salt to 2 cups of water and bring it to a boil. Add rice and cook until tender, stirring frequently. When the rice is cooked all the water should be absorbed.
  2. Add the evaporated milk, orange zest, and brown sugar to the pot of cooked rice; cover and cook for 10 minutes.
  3. Uncover and cook, stirring frequently, for another 10 minutes or until the rice is very creamy and most of the liquid has been absorbed.
  4. Stir in the milk, vanilla and almond extracts and remove the rice from heat.
  5. While the rice is cooling to room temperature, boil an extra 1/4 cup of water and pour it into a mug. Add the yellow raisins to the water and stir, then let them sit for 5-10 minutes. This will plump up the raisins and bring out their sweetness.
  6. When the rice is at room temperature, stir in the dried cherries and the plumped up raisins and refrigerate for 2 hours or until chilled.
  7. When you serve up your rice pudding, add a dash of cinnamon or nutmeg to each serving and drizzle with honey for a great presentation.
  8. Enjoy!

Mmm. Look how plump those yellow raisins are.

Note: Yellow raisins are my favorite, but one of the best things about this dessert is that you can get creative and customize the “add-ins.” Try shredded coconut and pineapple, or go for fresh strawberries and blueberries. You could also toast some almond slices and sprinkle them on top. Once I tried adding a spoonful of fresh pomegranate seeds–the pop of juice against the creamy rice made a great flavor/texture combination.

Easy and Healthy Friday Night Dinner: Salmon with Roasted Carrots, Sweet Potato, and Colored Cauliflower

10 Sep

Fall semester began this week, and with the first week of classes were some quick take-out meals and half dinners (nothing like a couple handfuls of Kashi cereal). As a result, tonight Trusty and I were craving a healthy, satisfying dinner, and nothing seemed to fit the bill better than a thick piece of fish and some hearty roasted vegetables. So we splurged on two pieces of wild Alaskan King Salmon and picked up some carrots, a sweet potato, and a package of colored cauliflower. Colored cauliflower, you say–what’s that?! We said the same thing. A little research revealed this information:

  • Orange cauliflower contains 25 times the level of Vitamin A in the traditional white variety. The color comes from a natural mutation originally found in cauliflowers grown in a Canadian field in the 1970s.
  • Green cauliflower has been available in the US since the early ’90s. It’s actually cross between broccoli and cauliflower (and to me tastes more like broccoli than cauliflower).
  • Purple cauliflower is caused by the presence of the antioxidant anthocyanin, which also is found in red cabbage and red wine. It has a milder taste than traditional cauliflower, but is still very creamy, sweet, and slightly nutty.

    Delicious and pretty!

The preparation for this meal is wonderfully minimal. And lucky me, Trusty did all the cooking. Basically, you cut, season, then throw everything into the oven. This makes clean-up easy too–everything is roasted on baking sheets covered in aluminum foil, so you just throw the foil away–no scrubbing involved.

Here are our cast of characters: 1 sweet potato, a package of colored cauliflower, 2 carrots, and just under 1 pound of Wild Alaskan King Salmon (not pictured: 1 lemon (he's camera shy)).

Because the veggies will need to cook longer, get them prepped and in the oven first, then prep the salmon. When the veggies have 15 minutes left to cook, slide the salmon into the oven and there will be just enough time for it to cook, then rest, before the veggies finish up and it’s time to eat!

yum yum yum

To prepare the vegetables:

  • First, wash your veggies! Pre-heat the oven to 400°F.
  • Slice the carrots and sweet potato into wedges–either quartered or halved depending on the thickness. If you didn’t buy pre-sliced cauliflower, cut it up into florets.
  • Line 2 baking sheets with aluminum foil. This makes for really easy clean-up.
  • Place the carrot and sweet potato wedges on one baking sheet, and the cauliflower on another (this is because the cauliflower take a little longer to cook, so they need their own tray). Drizzle a little olive oil (about 2 tablespoons) and sprinkle salt and pepper over both trays of veggies.  Then, sprinkle some garlic powder over the cauliflower, and some chili powder over the carrots and sweet potatoes (this is only personal preference!).
  • Put both trays in the oven. Sweet potatoes and carrots will need about 30-35 minutes, and the cauliflower will need  about 40 minutes.

To prepare the salmon:

  • Line a baking sheet with aluminum foil, and add a dab of olive oil to the spot where you’ll place the fish fillets (this will make it easier to remove them).
  • Sprinkle salt, pepper, chili powder, and garlic powder on the salmon fillets. Slice up a lemon and add some slices on top.

    Cooking salmon in the oven is my favorite way to prepare it, or almost any kind of fish. It's hands-off and fool-proof, as long as you take the salmon out of the oven when the fat begins to appear. In my opinion it's the best way to keep a piece of fish moist, flakey, and flavorful.

  • Put into the oven (preheated to 400°F) for around 10 minutes (these were thicker pieces of salmon–about 1.5 inches–if you have a thinner fillet, you won’t need as much time).  When the fat/protein begins rising to the surface/sides of the fillet (it’s a whitish liquid), remove the fish from the oven and let it rest for 3-5 minutes.

Enjoy!

Look how pink and moist that fish is--YUM! King Salmon is especially delicious because it has a higher oil content, which gives it a rich (but not fishy) flavor and firm meat.

Power Up with this Power Shake

12 Aug

I’m gearing up to go back to grad school with this power shake, i.e. drowning my sorrows in this power shake. It’s actually really thick, delicious, and nutritious to boot. I’ve been making a batch in the morning, drinking half before my workout, then the other half afterwards. It’s quick and easy to make, gives me tons of energy, and tastes great. Can’t ask for much more from a fast breakfast.

Our cast of characters from left to right are: Soymilk, Agave Nectar, Ground Flaxseed, Frozen Blueberries, a Banana, and Soy Protein Powder.

Here’s the taste/nutritional breakdown: the soymilk provides calcium and vitamin D, the agave nectar adds sweetness without going crazy on your glycemic index (it’s easier for your body to process because it’s a more complex sugar than plain sugar), the ground flaxseed adds a wonderful nutty flavor and provides tons of fiber, the blueberries add sweetness and provide more fiber, banana adds a thickness and provides potassium, and the soy protein powder adds a frothy thickness and provides muscle building protein!

Ingredients:

  • 1 ½ cups of soymilk (I use regular flavored soymilk, but you can use Vanilla flavored soymilk, or regular Skim milk, if you prefer)
  • 1/8 cup (or 1 ½ tablespoons) of agave nectar (I bought mine at Costco–these days you should be able to find it at most grocery stores)
  • 2 tablespoons of ground flaxseed (available at most grocery stores, or, if you can’t find it there try GNC)
  • 1 cup of frozen blueberries
  • 1 ripe banana, sliced
  • 2 tablespoons of soy protein powder

Directions:

  1. Start by putting the soymilk in the blender. Add the agave nectar, ground flaxseed, frozen blueberries,  the sliced banana, and the soy protein powder.

    If you want your shake a little icer, add more frozen blueberries, or, a couple of ice cubes.

  2. Mix/blend for 30 seconds to 1 minute.

For a thicker shake, add an extra tablespoon of protein powder.

Enjoy!